A Guide to Drone Roof Inspections
Inspect a roof without leaving the ground.On this page:
- Introduction
- Rules
- Conducting the Inspection
- Overview Photos
- Thermography
- Areas to concentrate on
- Roofing materials
- Gutters
- Flashings, Facia and Soffit
- Gables, Eaves and Overhangs
- Valleys and Abutments
- Ridges, Hips
- Dormers
- Vents
- Skylights
- Antennas and aerials
- Solar panels
- Lightning protection
- Inside the roof
- Conclusion
Introduction
The advent of drones has revolutionised the roof inspection process. Drone have made roof inspections safer, cheaper and faster. They have also added new "tools" to the roof inspector's box. Here we are going to look at exactly what it takes to perform drone roof inspections in Ireland.
Please note that for larger roofs, commercial and industrial inspections, or inspections where the public may be present, we'd definitely recommend getting a specialist drone inspection company (such as ourselves). You can find information about our drone roof inspection services here
Drone flying
What you want the drone to do
What you want to do is simple. Take high-resolution pictures and thermal imagery of all aspects of a roof structure. The following is a list of desirable features in a roof inspection drone:
Essential
- Medium resolution camera (minimum 12 megapixels)
- 4K video capability
- Thermal camera
Preferred
- High-resolution camera (20 megapixel)
- Optically zoomed main camera lens
- 640x512px resolution thermal camera
- 360 degree collision sensors
- 30 minute flight time
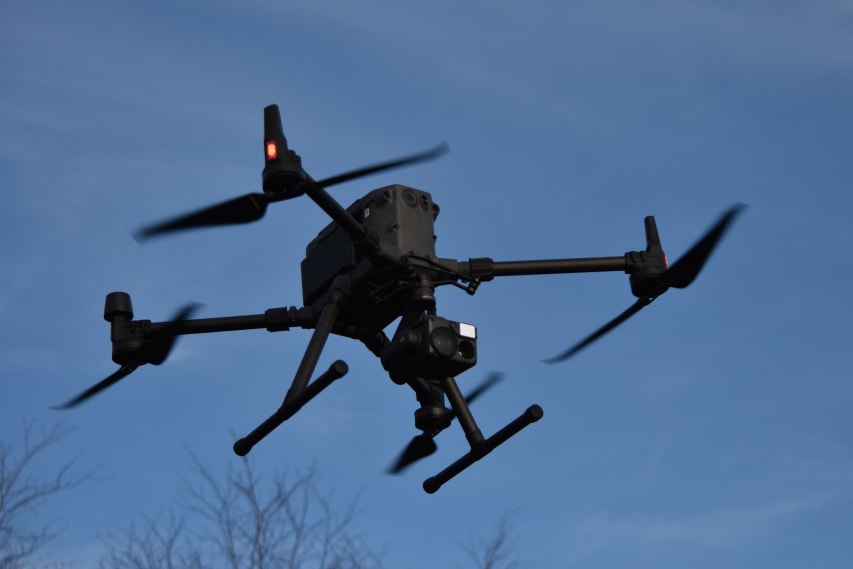
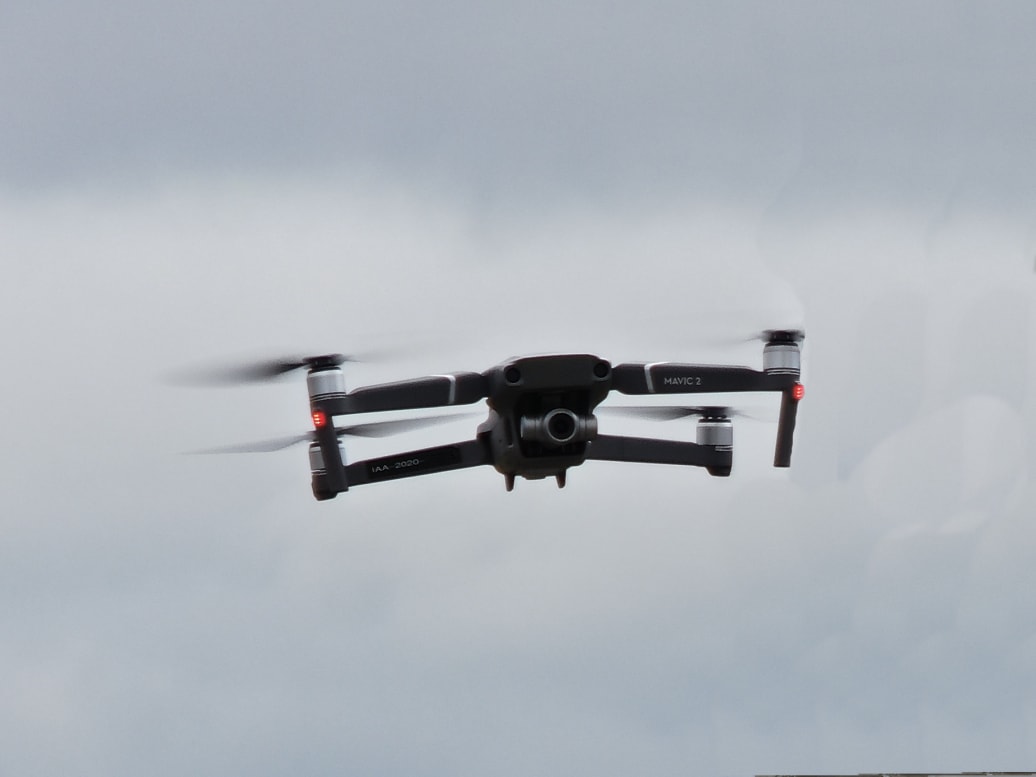
Examples of usable drones:
DJI M300 + Zenmuse H20T
DJI Mavic 2 Zoom
Bigger does not automatically mean better
An important point to consider: just because a drone is bigger does not mean that it is the best drone for the job. If you need to inspect a roof in inner city Dublin next to a busy street with limited take-off point options then a small Mavic type drone is a far better option than something like a DJI M300 RTK. In other words: there are more factors involved in choosing a drone than just how big and fancy it is.
Conducting the Inspection
When conducting drone operations to perform a roof inspection, there are a number of important considerations to look at:
Take-off locations
In rural environments, finding a suitable take-off point is usually quite easy. An open area free of vertical obstructions (Like power lines and poles) is usually easy to find. Isolating that area from bystanders is a simple case of erecting a barrier. For this reason we will not dwell on rural operations.
For urban operation, it can be quite a bit more difficult. The take-off point will be dictated by a number of factors such as drone size, topography of the inspection site, vertical obstructions and line of sight issues. Typical options for restricted sites are:
- Back gardens of houses
- Beer gardens, decks, verandas and other outdoor spaces (with owners permission of course)
- Rooftop terraces
Most important is to make sure you have good line of sight to the drone at all times, can maintain a safe level of control over the space and you can easily conduct operations without distraction. Basically anywhere you can isolate from bystanders and is vertically open is a good spot to launch from.
Flight considerations
Flying around buildings and roofs has its own unique set of flight considerations. Let's look at some of these in more detail.
Thermals
On sunny days a dark roof can produce quite a bit of thermal turbulence. This is due to the hot roof generating a lot of heated air just above the roof, which rises to produce what are known as "Thermals". It is important to consider this when flying near dark roofs on sunny days.
Updrafts and Downdrafts
Updrafts and downdrafts are found on the windward and leeward side of a roof on a windy day and can be catastrophic to fly through if you are not careful.
The easiest way to mitigate these hazards is to fly at a safe stand-off distance from the roof and use an optically zoomed camera to get the detailed imagery required to perform the inspection. This may not always be possible, so due care and attention is required when flying when these conditions may be present.
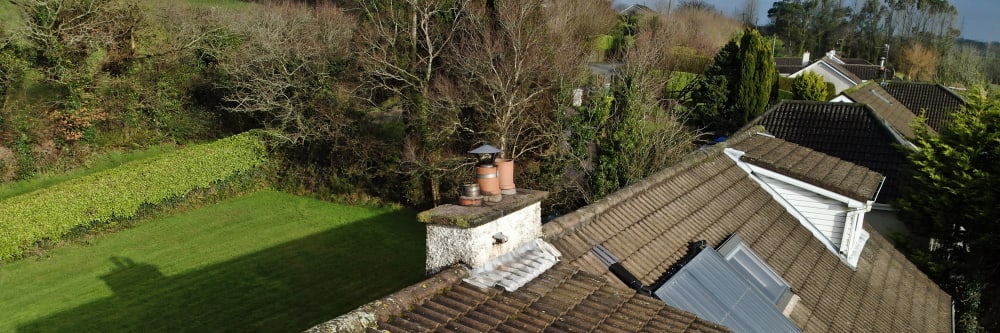
Overview Photos
It is important to get good overview pathos of any roof being inspected. Getting a bunch of close-up photos of defects without knowing where they are in relation to the roof as a whole is useless. With this in mind, we would typically recommend getting the following overview shots as a bare minimum:
- Whole roof nadir (or "top down")
- Each pitch contained in a single photo
- A photo of each side of the buildings showing the roof
- Thermography shots of all of the above (where applicable)
Thermography
Thermography is another excellent tool to have in one's toolbox when conducting roof inspections. Thermography (also known as infrared imaging) allows you to "see beneath the surface" so to speak. When it comes to roofs, there are two broad areas where thermography is useful during inspections:
- Detecting rain water ingress and delamination
- Detecting escaping air, insulation issues or thermal bridging in the building envelope
Water Ingress
When water ingresses a roof structure, the leaks show up as areas of different temperature in a thermographic image. The saturated area of the roof cools and heats at a different rate to the surrounding dry parts and so leaks can be identified with the thermal camera.
Insulation Issues
Insulation in building walls and roofs can degrade over time. This may be due to poor installation or missing insulation from day one, but can also be due to sagging or rodent damage. Areas of damaged or missing insulation show up as spots on the surface with a clear temperature differential from the surrounding facade.
Thermal Bridging
With thermal bridging the outward transmission of heat shows up as "hot" spots in what should otherwise be a uniform temperature. This can be very useful for identifying severe thermal bridges to be broken.
Escaping Air
With escaping air the outward movement of heated air shows up as a warmed area on the surfaces surrounding the leak. This can be very useful for checking building envelope integrity.
Areas to concentrate on
The following areas are important to concentrate on when conducting a drone roof inspection: Not all of these are applicable to the roof you may want to inspect.
The Whole Roof
The first thing to do when inspecting a roof is to step back and look at the roof as a whole. Look at the total area of the roof to identify any broad issues. Areas to concentrate on are:
- Is the flow of water off the roof correct?
- Is the roof as a whole clear of debris such as branches and pizzas?
- Are there any trees or other items leaning on or abrading the roof?
- Does the roof seem structurally intact, or is there a clear sag in certain areas?
Roofing materials
Next, it is good to look at the roof covering materials themselves. Look at each covering and assess its condition individually and also as a whole.
Slates / tiles / shingles
Slates tiles and shingles are an old but reliable technology. When it comes to inspecting them with a drone, it's best to concentrate on the fundamentals:
- Are there any missing?
- Are there any cracks or damages?
- Are they installed incorrectly?
Fiberglass and composites
Fiberglass and other composite materials are a relatively new technology for roofs. This does not exempt them from being thoroughly inspected, as they can still have defects that need rectification. Let's take a look at some of the issues you may encounter:
- Is there delamination?
- Is the gelcoat intact?
- Is there severe crazing?
- Are there bubbles forming?
- Are there signs of leaks in the thermal imagery? (relative cold spots)
- UV Damage
- Discolouration (could be indicative of an underlying defect)
Sheet metal and plastic materials
Sheet metal and plastic roofing materials are well suited to inspection by drone. The uniform nature of their corrugations lends itself to easy identification of issues. Let's take a look at some of these:
- Damaged corrosion protection (paint of galvanized coating)
- Severe dents
- Cracks
- Proper fastening
- Missing fasteners
- Loose sheets
- Correct installation and overlap
- Severe crazing (plastic materials)
- UV/weather damage (plastic materials)
Bitumen / Felt
Whole bituminous felt roofs are an older technology; it still has its place in the new roof installations. For this reason, it is still a very common roofing material choice and should be inspected regularly to verify its integrity. Since this material is primarily used on flat roofs, it is more susceptible to issues. Items to concentrate on are:
- Reflective coating integrity (where applicable)
- Lifting seams
- Organic growth
- Ponding water
- Punctures
- Cracks
- Bubbles or blisters
- Broad micro-cracking
TPO / PVC / EPDM
Use of sheets of large synthetic material for roofing is a relatively modern technology. These roofing materials can give a long life provided they are inspected at a regular interval. Here are some of the areas to concentrate on:
- Punctures
- Leaks (thermography can be useful here)
- Weathering / UV damage
- UV deterioration
- Pooling water
- Organic material build-up
- Bubbles and blisters
Built-up / gravel roofs
Flat built up roofs feature a layer of gravel on top to protect the underlying structure from the elements. They are becoming less common in modern buildings but still feature in a lot of older buildings. Let's take a look at issues you may find with these:
- Organic growth build up
- "Bald" patches where the gravel has moved to reveal the substrate
- Gravel piling around drains
Gutters
Gutters are a slightly more complicated matter to inspect with a drone, but again the fundamentals apply. When looking at gutter, concentrate on the following areas:
- Are they present?
- Are there any obvious leaks (Look for streaks, stains or organic build up below the gutters)
- Are they installed correctly and have the correct fall inclination?
- Are they clear of debris such as leaves and dirt?
- Are all the fasteners and joints intact?
Flashings, Facia and Soffit
Facias, soffits and flashings are the parts of a roof that can be overlooked, but there is significant scope for structural damage if these areas are not paid attention to. A damaged or badly installed flashing can lead to severe deterioration of the underlying structure if not rectified quickly. Let's take a look at what to concentrate on here:
- Loose panels and boards
- Incorrectly installed trims
- Damaged flashings
- Debris build up
- Water drainage issues
- Leaks and punctures
Gables, Eaves and Overhangs
Eaves and overhangs are a particularly vulnerable area of any roof system. This is because they are exposed to the full force of the elements. This is particularly true of wind, which can exert a significant lifting force on these areas. This can cause significant damage if not inspected and maintained correctly. Areas to look out for here include:
- Damaged brackets and braces
- Rotting timbers
- Loose panels
- Lifting edge tiles
- Lifting flashings
Valleys and Abutments
Valleys and abutments should be a specific target area in any UAV roof inspection. This is due to the tendency for debris to collect in these "concave" areas that are not exposed to wind. Here are some points to look out for:
- Build up of debris
- Build up of organic matter
- Incorrectly fitted flashings
- Loose roofing materials
- Damaged flashings
Ridges, Hips
These areas are the opposite to Valleys and abutments in that they are quite exposed to the elements. For this reason, it is important to look for damage that may allow these same elements to gain access to the internal structure of the roof. Remember in these areas it is possible for water to be blown upwards against gravity in strong winds, so good sealing is essential. Items to look for include:
- Loose or missing ridge tiles and flashings
- Cracked ridge tiles
- Missing fasteners
- Badly installed ridge materials
- Possible water ingress points
- Possible wind lift points
- Sealing
Dormers
Dormers can basically be treated as a "mini roof" in the sense that they contain all the same elements as the main roof. For this reason we do not have to go into too much detail here. The only significant item to look out for is degradation of the side walls and wind flashings. This is especially important if they are made of wood, even though this is becoming rare in this age.
Vents
Vents tend not to cause too much issue for roofs, provided they are installed correctly. Some items to look out for may be:
- Missing fasteners
- Missing insect/bird screen
- Birds nests
- Poor installation
- Water ingress points
Skylights
Modern Velux type skylights have been around a while now, and the technology is mature. They do not tend to cause much issue, so long as they are installed correctly and well maintained. The maintenance of these is especially important in coastal areas, where salt build-up on the metal hardware can cause degradation over time. When inspecting with a UAV, the items to keep in mind are:
- Correctly installed flashings
- Broken tiles around the skylights
- Debris
- Cracked or broken glass
- Corroded outer shell
Antennas and aerials
While not part of the roof itself, antennas / aerials and satellite dishes are an important aspect of any roof inspection. A poorly fitted or deteriorated dish or antenna is a hazard to people below the roof and also to the roof itself. Weather vanes and other types of roof mounted fixtures come under this category. Items to look at include:
- Loose fixtures and fasteners
- Loose wires
- Broken guy wires
- Corroded fixing poles
Solar panels
Solar panels can present their own set of concerns for drone roof inspectors. The "wind lift" hazard is an important one to check for in these large flat objects. It is not the job of the roof inspector to verify the functionality of the panels, but there are some obvious defects that can be reported on:
- Debris on the panels (especially in wooded areas with lots of birds and leaves)
- Loose fasteners
- Leaking pipes
- Crazed or cracked surfaces
- UV damaged (opaque) surfaces
- Loose or broken wires
- Poorly installed pipe and wire glands
Lightning protection
Lightning protection systems are an essential part of a building's protective defences. It is important to check their condition on any roof inspection. While verifying the electrical continuity of the system is not part of a drone based inspection, there are still plenty of items that can be checked using a UAV:
- Heat and burn damage
- Heavy corrosion (especially at fasteners)
- Missing grounding wires or connections
What about inside the roof?
It should be noted that a drone based roof inspection only covers what is visible on the outside of the roof. There is a whole supporting structure under this which may need to be inspected too. One useful tool the serious drone operator can bring to this problem is an internal confined space drone. These drones are designed to fly inside buildings and inside tight spaces. They are perfect for inspecting high roofs inside churches, warehouses and other such buildings.
Conclusion
The drone is truly a game changing technology when it comes to roof inspections. The removal of the working at height risk and the speed and efficiency of use has made this an essential part of any roof inspector's tool kit. Having the ability to identify issues early also drastically reduces the risk to the public from falling debris or structural collapse.
It is important to remember, the drone itself is only a tool, the person flying it is what truly matters. The drone operator must know what they are looking at otherwise they may as well be a goat staring into a bottle!